Friday 9 January 2015

Winter Tree Canvas

I thought I would blog my process for working on a canvas
Basically, I just start by using something I like as a base point

I used some pollyfiller through the winter tree stencil, there was some blue ink left on the stencil which gave the texture that blue colour.
Then I added some torn book pages,


And a few blobs of blue paint, at this point I had no idea where it was going!


Ruined it totally with the mustard colour!  Where do I go now?


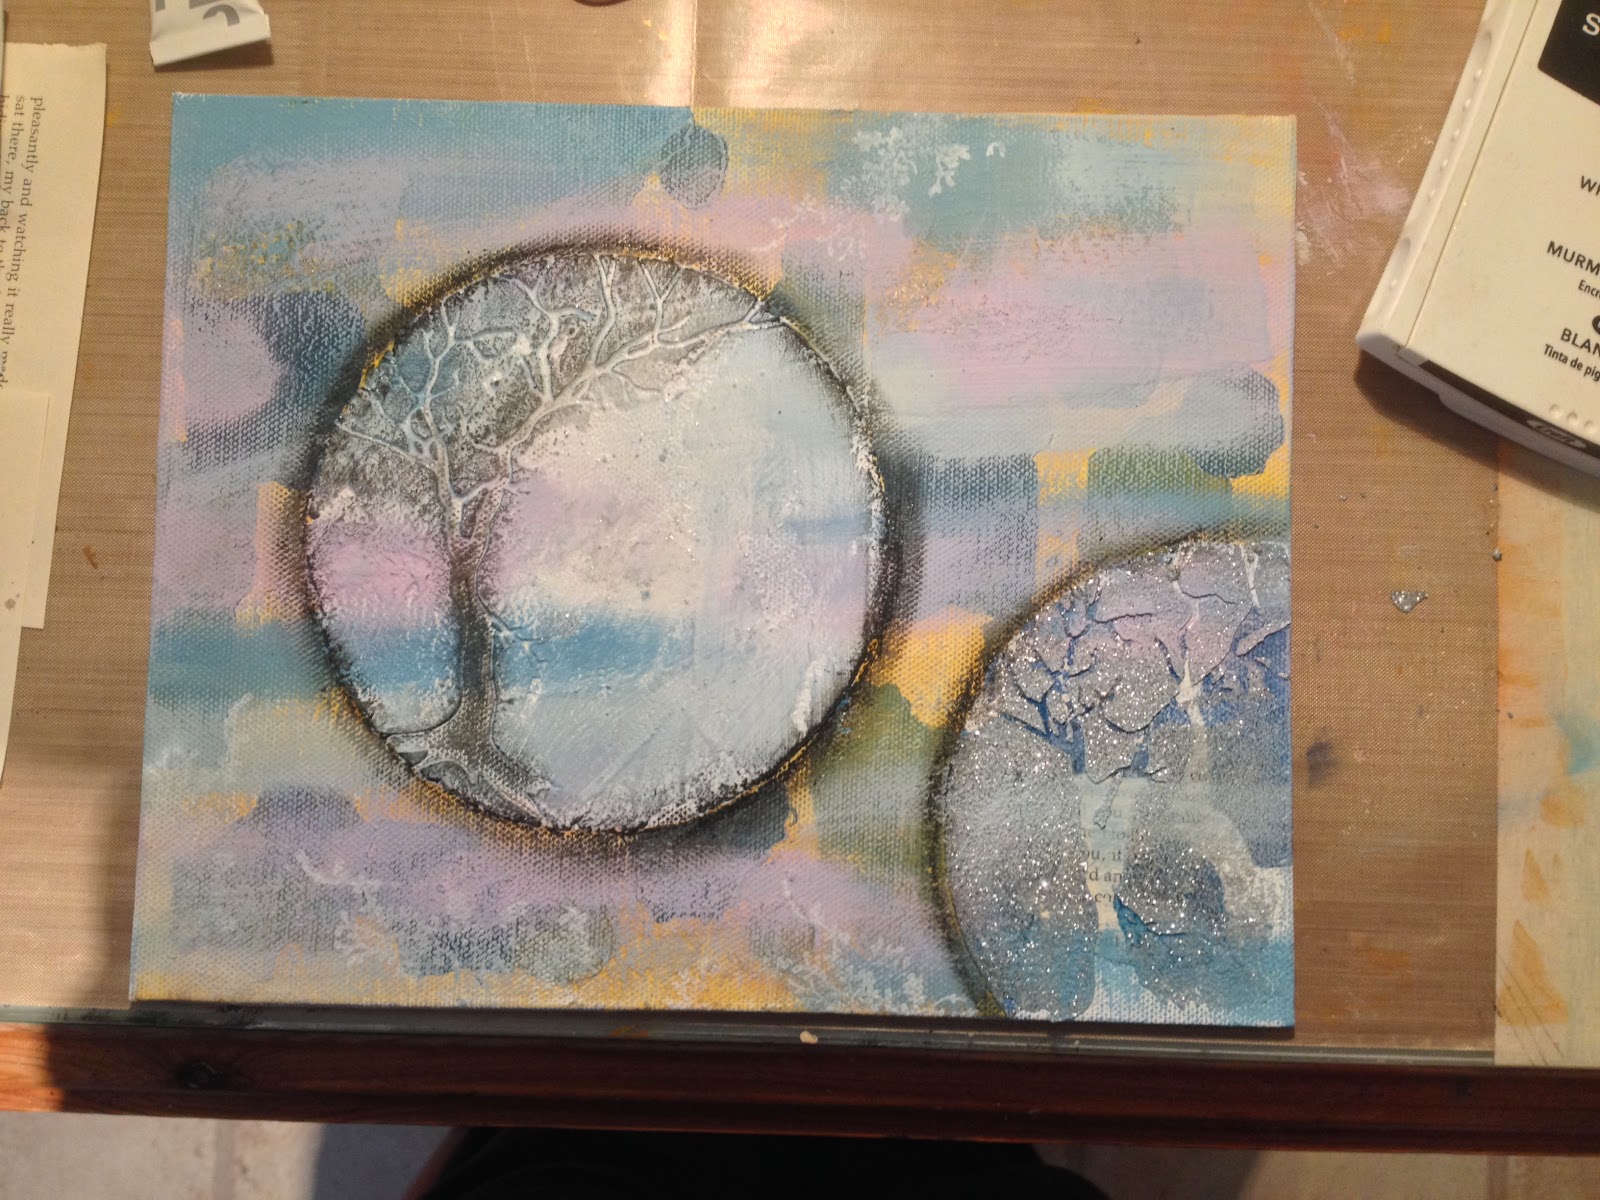
I swept across it with some white, pink and blue acrylic paints and then went round the circles with a black oil pastel and rubbed it with my finger to blend it.  The other circle I did with sparkle texture paste.


I added some white paint with some texture pads and then some embossed blossom.  Stamped some birds, I like these birds.  I also brushed some gold acrylic paint across it too.  The circles weren't quite dark enough so I used a really small brush and some black glossy paint.  To frame it all I went round the edge with versamark ink and used black embossing powder.  Then just onto another white canvas.

It's taken me four days of going back to it, but I think I'm finished now.  The point is, even if you think you've ruined something it isn't always the case.  Also, you don't always have to have a plan!  
I never do. Xx

Thursday 8 January 2015


I forgot to show you what was in it!
I have wanted these stamps for ages, they are so lovely.
I love my boy! Xx

The eldest is Ryan, 17 and the youngest is Harry, 14.

Yeah! My Christmas present arrived today that my son bought me.  He is 17 and has a part time job at the golf club while he's in Sixth Form.  This is the first present he has ever bought me and I couldn't be happier.

It's the Stamper Hamper from Clarity Stamps!
I'm so looking forward to a day playing tomorrow!!

Monday 5 January 2015


Hi, I thought I would share something that I actually made a while ago, 
But since it's using Clarity products, I thought I would give it an airing.
It was made using the gelli plate and the poppy stencil. Then when I'd pulled the print 
I put the stencil back on and used some bright inks throug it
To highlight the flowers.  It was one of my first attempts at this 
And I was really pleased with it so I made a frame to match.
For the life of me I haven't been able to recreate it, it never goes quite right.
But I suppose that's the nature of the gelli plate.

Saturday 3 January 2015

Hi all, I have down some housework today,
And frittered the rest of the day on blogs and trying to suss out
Getting photos on blogs. 
I normally do most of my stuff on an iPad, which for some reason today,
Just doesn't like giving up its phots.
I have realised that if I take the photos with the iPad i can use them, so that's my future 
Blogging sorted.
By the way, this is Milly (the model for the day!) she didn't mind,
And goth paid in cheese. Xx

Thursday 1 January 2015


Hi all, and welcome to my first post as a member of the 'Clarity Challenge Blog' design team.  I'm hoping that you will be inspired by my work as I have been inspired by the previous team.
    I'm afraid I'm not very technical so my blog is, at the present, very basic.  Hopefully I will be able to change that as time goes by.
    My offering for the first challenge 'Things with Wings' ended up being nothing how I first imaged it.  I started off with the Clarity bird stencil, and put some texture paste through, then let it dry thoroughly.  I replaced the stencil and inked through with a versamark ink pad, removed the stencil and sprinkled with clear embossing powder.  When I heated it the paste bubbled a bit and gave a lovely texture.
    The whole thing was then painted over with Daler Rowney System 3 acrylics, a mixture of red, orange and rich gold.  The highlights on the birds comes from wiping with a babywipe and kitchen towel.  The birds still didn't stand out enough so I used a white Wink of Stella pen to go around them.  The branches were painted over with some Pebeo gilding wax (fantastic stuff) to give some more bling.
    I picked the frame up for a pound in some homeware store, I covered it in black gesso, then some black gloss paint to get it really black, then rubbed more gilding wax on with my fingers.  Once it's dry you can buff it up to a lovely shine.  I then stamped with the large Clarity flourish stamp with
versamark and heat embossed with black embossing powder to finish off.

I do hope you like, and next time I will remember to take photos during the crafting process and not just after.  If anyone wants any more info, or help with anything crafty, please leave me a message.

HAPPY NEW YEAR TO YOU ALL!