Thursday, 3 December 2015

ClarityStamp Challenge - A Christmas Story

Hello and welcome fellow crafters on a very wet and windy day in Yorkshire.


This months inspiration started off life as a plain piece of kraft card.  I don't have many Christmas stamps so I had to just use the couple that I did have.  I started off by stamping the holly stamp around the edge of the card with versamark ink and then heat embossing with white embossing powder.  I really love this effect on the kraft card.


I decided to use pencils to  colour the holly in, but half way through I regretted this decision as I spent an awful lot of time sharpening my pencils.  The kraft card was really quite rough and was blunting them rather quickly.  It looked nice when finished though.


I wasn't sure what to do at this point, so just looked at it for a couple of days.  Then I had one of those 'aha' moments whilst looking through my stencils.  I placed the winter tree stencil over the card with the obligatory moon mask too.  I used chipped sapphire and gathered twigs distress inks through the stencil with cut and dry foam, as I wanted the ink really dark.  When I removed the stencil I noticed that the ink was still really wet so thought i would put some clear embossing powder over it.  When I heated it I noticed that it had lots of white flecks in it that must have in the clear.  I must admit it looked really cool, like snowflakes.


I edged the card with more of the gathered twigs ink, but it was still lacking something, so out came the gilding wax.  I rubbed some into the moon and then around the edge of the card.  Also onto the black card that I mounted it onto.  The word and stag stamps were done in versamark ink and heat embossed with gold to match.  I really loved the overall look of this one, even my Mum likes it and she's my biggest critic! 


I do hope you have enjoyed reading my blog, it was a bit of a long one this time.  I hope you find some inspiration and can join in with the challenge.

Hugs
Amanda xx

Monday, 2 November 2015

ClarityStamp Challenge - Clean and Simple

Hello bloggers and welcome to this months blog, which is all about being clean and simple.


This is not something that comes easy to me, especially the clean part.  I always end up covered in whatever medium I am using.

This card came to me when I wasn't even thinking about it.  It just popped in, so I got on and did it straight away before I forgot.

Firstly I used various sizes of circle dies and cut out holes in a descending order.  Then got to work on the backing card.  I drew through the holes with a pencil so that I would have a bit of an idea where I was working.  Then used pink and blue distress ink to sweep across the area.


It looked a little too dark so I used a white inkpad and a scruffy brush and went across each area with this.  It gave a lovely whitewashed effect.

Next came the stamping, I always knew I wanted to use the boy stamp, but I needed more birds.  Luckily Clarity have lots of sets that have different sized birds which are really useful.

Once stamped, it was just a case of placing the holey piece on top and glueing.  I went round with the obligatory black marker to finish off.


   Eh Voila!

Thanks for reading, hope you feel inspired to give this a go.

Hugs
Amanda


Claritystamp Challenge - Stencils

Hi bloggers, I must admit this has been one of my favourite challenges as I love stencils.


I started off by using a pencil to draw through the elegant lady stencil and the mirror, I then flipped the stencil to draw in the reflection.


 Next I used coloured pencils to colour her in, I must admit this did take me quite a while.  I think I lost a few hours here!  But they were very enjoyable hours.


Once coloured I cut some masks to cover the images and places the trees stencil over the top.  
 I also used some of the snowflake stencils but I forgot to photograph that bit.


I used distress ink at first and then removed the stencils and put in some definition using pencils.  I was pleased with the overall effect.  It also shows that stencils can be used in alsorts of ways.  I think that especially with the Clarity stencils a lot of them can be used in this way, to draw round and colour in.

I hope you have enjoyed reading my blog.
Hugs 
Amanda


Tuesday, 1 September 2015

Clarity Stamp Challenge - Shaped Card

Hi bloggers, this is my card for this months theme, which is a shaped card.


I really wasn't looking forward to this challenge as these sort of cards are way out of my comfort zone, but once I got started and had an idea in my head I really enjoyed it.

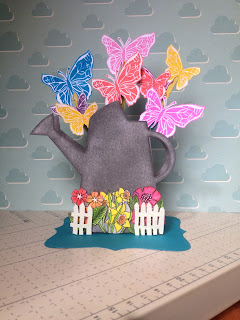
I started off with a template of a watering can which I coloured with one of the new distress inks, Hickory Smoke, which is a lovely colour and so useful.


Once I had that done is was time to make the butterflies.  I had some sticks which I coloured with various inks, then I stamped lots of different coloured butterflies, cut them out and stuck them on the sticks, varying the lengths of the sticks.


I then stamped and cut out three different flowers to attach to the bottom of the watering can.  It needed something else, so I stamped and embossed the fence with white embossing powder and cut this out too.


Then it was just a case of sticky everything together.  I was quite pleased with the finished result, although it did take longer than expected.  The flower stamps that I used are some quite old Clarity ones, but still very useful.  I don't have a lot of the new ones but I like that they never date and I can always do something with the ones I have.

Thank you very much for reading my blog, I would love it if you could leave me a little message.

Hugs,
Amanda xx


Saturday, 8 August 2015

Pot for Mum


Hi, I just thought I would share this pot that I upcycled for my Mum.  It was an old terracotta pot with a bit of a naff picture of an orange on it.  She asked me if I could do something with it, of course I could.  I started by painting it with the PaperArtsy fresco finish paints (can't remember the colour), then I stamped these lovely PaperArtsy Lin Brown flowers and leaves in versamark ink and embossed them in lemon and orange embossing powder.


I have just sent my Mum a photo of it and she loves it!  Yeah!

Thanks for looking.
Hugs
Amanda xx

I am linking this project to the PaperArtsy blog challenge - Flowers.
This piece was inspired by Lin Browns blog 

Which although uses different products, did remind me that I had some lovely Lin Brown stamps that 
would look great embossed onto the pot.
Xx


Saturday, 1 August 2015

Clarity Challenge - BINGO


Hello and welcome to this months blog.  My Bingo is a line down the middle, which means that I have used, gilding flakes, stamps and dies.

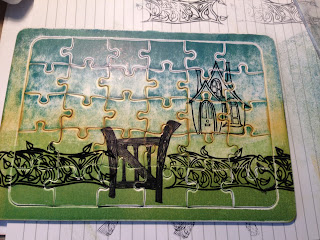
This project was inspired by a piece by my good friend Amanda Branagan, and started out life as a cheap blank kids jigsaw puzzle.  First of all I started off by brayering some hills and sky with Adirondak inks, my brayer had been used for acrylics and not washed so it gave quite a nice texture.


Next I used a mask and some yellow Fresco paint to put in a sun.  I used the funky house and gate which I masked off and then stamped the funky trees and fence.


Next came the gilding flakes, which I love, but always end up getting everywhere but on the project.  After much huffing and puffing I got it where it needed to be.


I coloured the picture in with distress markers and wink of Stella pens to add some sparkle.

I don't have that many dies, but i like this one, which is a MFT die with three different types of tatty labels.  I used my alphabet rotary stamp to add the stamped sentiment on the piece. 


I hope you like it and will join in with the Clarity Challenge this month.

Thanks for taking the time to read my blog.
Hugs,
Amanda xx


Wednesday, 22 July 2015

Clarity Stamps Challenge - Anything goes


Hi my blogging friends, this is my inspiration for this months challenge.
I found this one extremely difficult, as I just couldn't decide on what to do.  I have put up a couple of rejections on Facebook before I finally decide on this on.  Although this wasn't as straight forward as it could have been.

I started off with a brusho background, and then my favourite stencil, which I pulled some grunge past through.


I start off embossing it with gold embossing powder, but I didn't like it too much, so I then used red, and finally settled on white.


I wanted the background to be Kraft cart edged in black so I used my sharpie pen as an edge. 


I then went round with a white pen for definition.


I sponged through some orange in to the flowers to give definition.  I also used some black spray ink to add some interest too.
Hope you like it.

Please leave some love if you do..
Hugs
Amanda xx


Monday, 1 June 2015

Claritystamp Challenge - Boys, boys, boys

Hi all, and welcome to my little blog.

This is the card that I ended up with for this challenge, although it wasn't the one I intended on, yet again!  The original will be blogged at a later date Lol!

This one however started off with the landscape mask of the rooftops, and a white inkpad sponged over it.  I wanted the houses in the foreground to stand out quite a bit so I used clear embossing powder over the top, which gave a really nice effect.

Next I kept moving the mask further up the card and sponging through with the white again, but only lightly now.  I then used the outer of the moon mask and went through with the white.

I wasn't sure what to do next, but I had recently bought some gilding flakes, so decided to give them a go with the male fairies/elves.  So I stamped them with the glue and gave them a gilding!
Quite impressed!  I was then on a roll and decided to do some more, so I used the star stamp round the edge and gilded those too.


The artwork was then mounted onto a white card base and black lines drawn around to add definition.
I was quite pleased in the end.
I hope you can join in with this months Clarity Challenge.


Saturday, 2 May 2015

Clarity Challenge - Clocks

Hi my little blog friends, welcome to this months Clarity Challenge Blog.


Once again, a project that started life as something completely different. I started off painting a piece of heavyweight card with some turquoise paint, then I used some Fresco Finish Crackle which Clarity now stock.  Once dried I brayered some nougat fresco paint, and waited for the crackle.


Its the first time I've used this crackle, and it's perfect.  It works like a treat, very impressed.


I used some small flower stamps from the elegant lady accessory set, to stamp over with and then cut out a large circle.  I then used some grunge paste through the round number stencil, painted it when dry and then rubbed some of the amazing pebeo gilding wax over it.  At this point I got stuck and wasn't sure where to go.  I spent ages looking through my stamps until I saw the butterflies, and that was it.


After three hours of stamping, embossing and cutting out I had a lovely pile of butterflies to use.
I did some matting and layering, some more stamping (most of which actually got covered up), and we were done.  

I think as Barbara says, we should slow down and enjoy the times that make us happy.  If crafting and pottering makes you happy, don't feel guilty about it, do more of it.

Thanks for taking the time to read my blog, I really appreciate it.

Happy Crafting!